Python
SENSUS Python provides Python wrappers for integrating the SENSUS SDK into a Python codebase.
Installation
Ubuntu 22.04 (x86_64)
Follow these steps to install the SENSUS SDK:
- Download the SENSUS SDK package from calyo.com
- Install the SENSUS 3rd-party package:
sudo apt install ./sensus-3rdparty_*.*.*.deb
- Install the SDK
.debpackage:
- For CPU:
sudo apt install ./sensus-sdk_*.*.*.deb - For CUDA:
sudo apt install ./sensus-sdk-cuda_*.*.*.deb
-
Adding udev rules
sudo touch /etc/udev/rules.d/99-calyoftdi.rulesAdd the following to */etc/udev/rules.d/99-calyoftdi.rules*SUBSYSTEMS=="usb",ATTRS{idProduct}=="6014",ATTRS{idVendor}=="0403",GROUP="plugdev",MODE="666"
ATTRS{idVendor}=="0403", ATTRS{idProduct}=="6014", ACTION=="add", RUN+="/sbin/rmmod ftdi_sio"
ATTRS{idVendor}=="0403", ATTRS{idProduct}=="6014", ACTION=="remove", RUN+=""Then reload the udev rules:
sudo udevadm control --reload
Windows (x86_64)
** Coming soon **
Please use WSL in the meantime if you require a Windows machine (Limited Support)
Usage
The Python integration consists of two components:
- The compiled SENSUS SDK (installed above).
- The
sensus.pymodule, which links to the SENSUS SDK and exposes a Pythonic API.
Setting Up Your Python Environment
Create a new Python project and virtual environment (optional but recommended).
The sensus.py module uses only the standard library, but a virtual environment can help manage any additional python packages you require (e.g., matplotlib for visualisation).
You can use any environment tool you're comfortable with:
- venv (Python Standard Library)
- virtualenv
- conda
- uv
For example using venv:
mkdir sensus-python-example   # Create a new project folder
cd sensus-python-example      # Navigate to the project
python -m venv .venv          # Create a new virtual environment
source .venv/bin/activate     # Activate the virtual environment
Debian/Ubuntu users might need to install venv with sudo apt-get install python3-venv
Integrating the Wrapper
- Copy
sensus.py(provided in the SENSUS SDK download) into your new project directory. - Create a new Python script in the same directory and import the module.
- Initialise a
Sensusobject with your desired configuration. (See examples for more details)
from sensus import SensusST

pulse = SensusST(<REPLACE-WITH-CONFIG>, 'CUDA')
# pulse = SensusST(<REPLACE-WITH-CONFIG>, 'CPU') # or initialise with 'CPU' if GPU is not available
See the examples below for typical usage patterns with the SENSUS Python integration.
SensusST stands for 'Single Threaded'. There is a multi-threaded version, SensusMT, which can provide asynchronous functionality with the calling thread
Examples
2D Intensity Map
Create a JSON file in your python project called python-2d-example.json containing the following configuration:
Click to view python-2d-example.json
{
  "type" : "calyosensus",
  "pipelines" : [
    {
      "id" : "imager_2d",
      "reader" : {
            "type": "DeviceReader",
            "serial_number": "any",
            "num_cycles": 20,
            "max_distance": 8.0,
      },
      "writer" : {
          "type" : "FrameBufferWriter"
      },
      "processor" : {
          "type" : {
              "stage" : "log_conversion",
              "configuration_options" : {
                  "algorithm" : "resolution",
                  "dimensions" : 2
              }
          },
          "runtime_parameters" : {
              "x_min" : -5.0,
              "x_max" : 5.0,
              "y_max" : 8.0,
              "r_min" : 0.8,
              "r_max" : 10,
              "r_step" : 0.1,
              "az_min_rads" : -1.57,
              "az_max_rads" : 1.57,
              "roi_pol2d_r_max": 10,
              "pixel_size" : 0.01,
              "angle_limit_enable" : true,
              "angle_limit_degrees" : 86.0,
              "normalisation_mode" : "norm2max",
              "normalisation_value" : 0.02,
              "db_scale" : -8.0,
              "cfar_enabled" : false
          }
      }
    }
  ]
}
Then in a python script:
from sensus import SensusST, load_json_as_string
import numpy as np
import matplotlib.pyplot as plt

# Load the config from file, extract the JSON, and initialise a SensusST object, setting the backend to 'CUDA'
path = "/home/calyo/Developer/python-eval/sensus-sdk/imager2d3d-cuda.json"
pulse = SensusST(load_json_as_string(path), 'CUDA')

# Finished early indicates failure to initialise
if pulse.finished():
    print(pulse.flush_logs())
    raise RuntimeError("Failed to initialise")

# Flush logs to find out what's going on
print(pulse.flush_logs())

# Run the sensor for one frame and flushing out the packets
# from the frame buffer to a list
packets = pulse.acquire_single_frame()

print(f"Received {len(packets)} packets!")

# Based on the config, single pipeline should output a single packet of type 'Mat2'
if (len(packets) == 1):
  print(['type'])

  # get image dims from the packet
  row = p['rows']
  cols = p['cols']

  # cast the data to a numpy array
  intensity_map_packet = np.array(p['data'])

  # plot the image with matplotlib
  fig = plt.figure(figsize=(12,7))
  ax = fig.add_subplot()
  image = np.reshape(intensity_map_packet, (row, cols))
  im = ax.imshow(image)
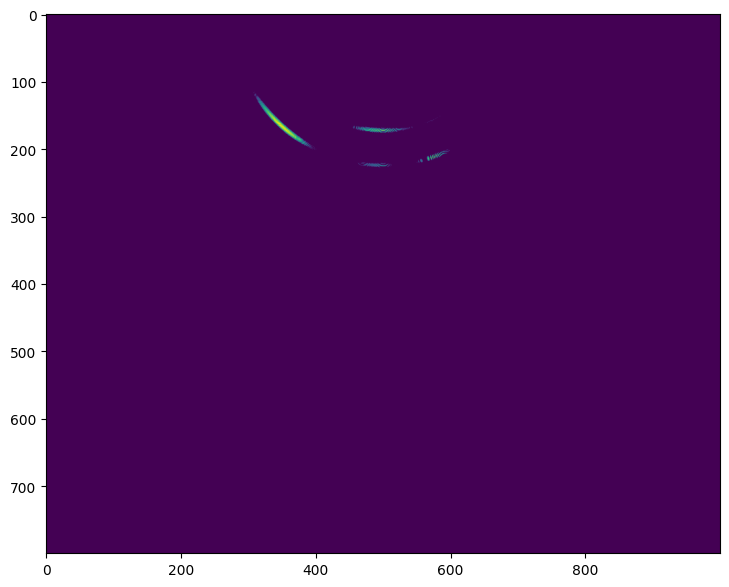
Click to view expected output
Breakdown
Let's break that down in more detail.
# Load the config from file, extract the JSON, and initialise a SensusST object, setting the backend to 'CUDA'
path = "/home/calyo/Developer/python-eval/sensus-sdk/imager2d3d-cuda.json"
pulse = SensusST(load_json_as_string(path), 'CUDA')
The Sensus class - and derived SensusST and SensusMT classes - accepts a string of json data in its constructor. This allows initialising the library using files saved to disk or by building the string data in code. In this example, the helper function load_json_as_string is used to read the contents of a json file saved to a given path, so that this data can be passed to the constructor.
The second argument, another string, specifies the type of hardware acceleration to use. Currently supported values include: 'CPU', the default backend using no hardware acceleration; and 'CUDA', using the CudaRuntime library, if available, to accelerate processing. The latter option is recommended, if your system supports it.
# Finished early indicates failure to initialise
if pulse.finished():
    print(pulse.flush_logs())
    raise RuntimeError("Failed to initialise")

# Flush logs to find out what's going on
print(pulse.flush_logs())
The SENSUS object will initialise on construction, at which point it will either (1) be ready for acquiring and processing frames of sensor data; or (2) have encountered an error during initialisation. In order to check the initialisation status, we poll the method finished(). Flushing the logs will give us further information about what happened on initialisation, which we can use to debug configurations and troubleshoot.
# Run the sensor for one frame and flushing out the packets
# from the frame buffer to a list
packets = pulse.acquire_single_frame()
This function seems self explanitory: acquire a single frame of data, run any processing steps requested by the configuration, and return the data from the function so that we can do something with it. There is, however, a slight complication, which is alluded to by the fact that the function returns an array of packets.
The reason for this is because the SENSUS SDK is very flexible and can be configured to do a variety of tasks while keeping a consistent API. In this case, the SENSUS backend will flush out whatever packets are in its framebuffer. This, in turn, will be defined by how many pipelines have been specified in the JSON configuration, and what the Writer types of those pipelines are.
Below are the three conditions in which the outputs of pipelines are available in the frame buffer:
- The
Writertype of the pipeline isFrameBufferWriter - There are pipelines whose input type is
FrameBufferReader. In this case, the output packets of the pipeline specified bysource_pipeline_idwill automatically be written to the frame buffer, regardless of that pipeline'sWritertype. - In the global scope of the JSON,
show_outputis set totrue. This tells the SDK to write all output packets from all pipelines to the frame buffer, regardless of theirWritertypes.
In this case, we do not have to worry about that, because our configuration file only contains one pipeline, whose Writer type is FrameBufferWriter - i.e., we want the SDK to return the output data to us through the SENSUS API so that we can do something with it in code.
# Based on the config, single pipeline should output a single packet of type 'Mat2'
if (len(packets) == 1):
  print(['type'])

  # get image dims from the packet
  row = p['rows']
  cols = p['cols']

  # cast the data to a numpy array
  intensity_map_packet = np.array(p['data'])

  # plot the image with matplotlib
  fig = plt.figure(figsize=(12,7))
  ax = fig.add_subplot()
  image = np.reshape(intensity_map_packet, (row, cols))
  im = ax.imshow(image)
Now we have the list of packets - of length 1 containing a single packet output from our pipeline 'imager_2d'. This packet will be a 2-D matrix of floating point values, representing an log-converted energy scape with each pixel representing intensity.
To plot the image, we use the python package matplotlib.
Capture raw signal data (XML)
In many applications, storing the raw bytes from the sensor can be beneficial, as it enables refinement of the SENSUS SDK parameters after data capture as if the sensor were operating live. This approach allows for post-capture analysis and calibration of the PULSE sensor, while keeping the overall data footprint relatively small. It also opens the door to advanced use cases, such as direct analysis of the raw acoustic signals by reconstructing them from the stored bytes.
To achieve this create a JSON file in your python project called python-signalcapture.json containing the following configuration:
Click to view python-signalcapture.json
{
  "type" : "calyosensus",
  "pipelines" : [
      {
        "id" : "datacapture_xml",
        "reader" : {
            "type": "DeviceReader",
            "serial_number": "any",
            "num_cycles": 20,
            "max_distance": 8.0,
          },
          "writer" : {
            "type" : "XMLWriter",
            "output_path" : "/<input-your-desired-output-folder>"
          },
          "processor" : {
            "type": "PassThroughPipeline"
          }
      }
  ]
}
Please replace
<input-your-desired-output-folder>with a absolute path to store you dataset
Then in a python script:
from sensus import SensusST, load_json_as_string # Import the SENSUS module and helper functions

# Configure Pulse Device
config_path = "<path-to-project-folder>/python-signalcapture.json"
pulse = SensusST(load_json_as_string(config), 'CUDA')

if pulse.finished():
    print(pulse.flush_logs())
    raise RuntimeError("Failed to initialise")

print(pulse.flush_logs())

# Capture 20 frames
for i in range(20):
    pulse.acquire_single_frame()
Example CLI App
Coming soon