Plug & Play
This tutorial covers some basic setup to allow you to plug in your PULSE sensor and get visualising the data right away.
What you will need
- A computer running Linux Ubuntu 22.04 (or higher)
- A Calyo PULSE Sensor
- SENSUS SDK downloaded and installed (see Downloading the SDK)
Open the SENSUS Viewer
-
Plug in your PULSE, launch a terminal window and type
sensusviewerto open the SENSUS Viewer application. -
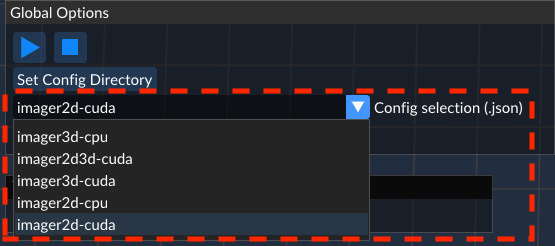
Open the
Config selectiondropdown from theGlobal Optionswindow and selectimager2d-cuda
warningPlease select the
imager2d-cpuif you do not have a CUDA enabled device and have installed the CPU version of the SDK.
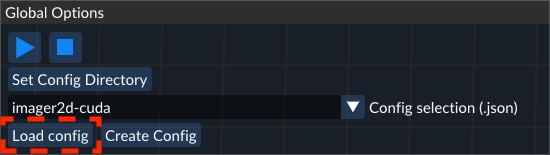
- The the configuration by pressing the
Load Configbutton.
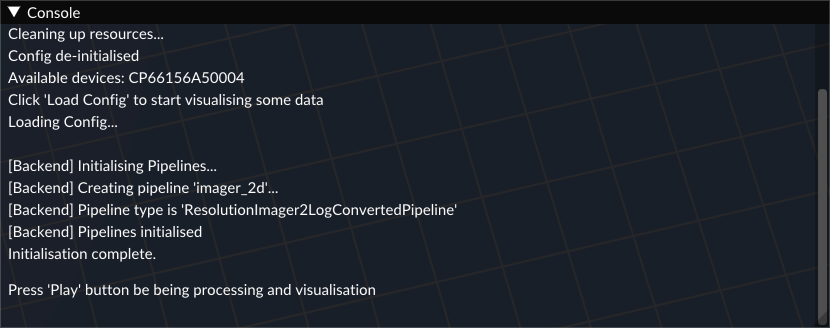
- Monitor the console window in the bottom right of your screen to ensure the config has been fully loaded, ensuring there are no error messages.
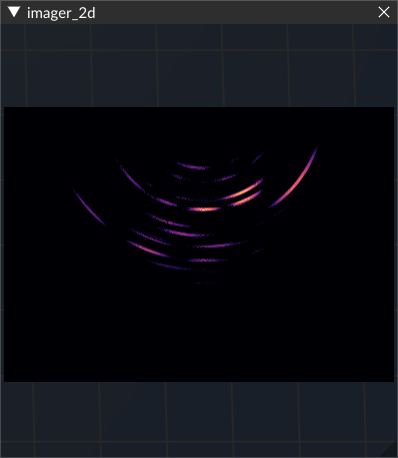
- Click the 'Play' button. A window should pop up in the top right corner of the screen showing the 2-D imaging.
You have now successfully setup the SENSUS Viewer, before moving on the the next steps feel free to explore the other default configurations provided to you.
(Press the ⏹️ button -> Select a new config -> Click Load Config -> Press the ▶️ button)
Setting Parameters
Once a config has been successfully loaded, a 'Parameters' drop down will appear in the menu on the left of the screen. This lists all of the available runtime parameters for your selecting processing pipeline. Changing any of these parameters will cause immediate changes in the processing of real time data, so it is useful for tuning your config in real time.
Note, however, that these changes are not saved to the config file. To save the changes, add/amend the corresponding parameter entry inside the 'ProcessorPipeline, for example':
{
	"id" : "imager_2d",
	"reader" : {
		"type" : "FrameBufferReader",
		"source" : "signal_capture"
	},
		"writer" : {
		"type" : "FrameBufferWriter"
	},
		"processor" : {
		"type" : "ResolutionImager2PointCloudPipeline",
		"coordinate_system" : 0
	}
}
The parameter entry coordinate_system sets the value to be 0, which tells the pipeline to generate images in a Cartesian coordinate system. Setting the value to 1, conversely, would produce images in a Polar coordinate system. More information about pipelines and parameters can be found at SDK Reference.
Other Configs
There are other configs available for isolating just 2-D or 3-D, as well as selecting different input, output and processing pipelines. Full reference is available on the website. Feel free to maintain your own directory of configs, tailored to your specific use cases. The button Select Config Directory can be used to tell the viewer to look in a custom directory instead of the default installed one. Here you can create your own config files, which can be used across all of the SENSUS software tools, including ROS.
The viewer is a basic GUI application with minimal dependencies, and is the quickest way to get visualising data from your pulse sensor. Very quickly, however, you will begin to require more features, such as plotting tools and integrations, which the Viewer does not support. For this, we need to move on to our integration with ROS and Foxglove.
ROS & Foxglove
To get started with our integrations with ROS and Foxglove ensure you have followed all the instructions on the Software Installation page and have the following ready:
- A computer running Linux Ubuntu 22.04 (or higher) and installed:
- ROS2 Humble
- Calyo SENSUS SDK
- Foxglove ROS Bridge
- A computer with Foxglove Studio and the calyoFoxgloveTools extension installed (Can be same device as above).
On the computer you have installed ROS2, Calyo SENSUS ROS packages and the SENSUS SDK, complete the following:
source /opt/ros/<ros-version>/setup.bash
We will be using a pre-made JSON configuration for the SENSUS SDK to display all the available features. Please download this JSON configuration here:
Download Example ConfigBefore using continuing we first must make sure the serial number in the configuration file matches your device. To do this, plug in your device and run the following command:
lsusb -v -d 0403:6014 2>/dev/null | grep iSerial | awk '{ print "Calyo PULSE S/N: "$3 }'

# Example Output -> Calyo PULSE S/N: CP66156A50003
Using your favourite text editor open the JSON file we just downloaded and update the serial_number entry on line 8 to match your device.
nano <your_path>/plug_and_play.json

# Change the following entry at top of the file:
# e.g. "serial_number" : "<YOUR_SERIAL_NUMBER>" -> "serial_number" : "CP66156A50003"
Now you can launch the Calyo SENSUS Driver node:
ros2 run calyosensus_ros_cuda driver --ros-args -p engine_config:=<your_path>/plug_and_play.json
# Replace `calyosensus_ros_cuda` for `calyosensus_ros` for the CPU version, if CUDA is not available.
You now have the Calyo ROS2 node running and should see the driver processing live frames from the sensor.
[INFO] [1738603062.335225761] [calyosensus_node]: Path at:
[INFO] [1738603062.335437982] [calyosensus_node]: <your_path>/config/plug_and_play.json
[INFO] [1738603062.335929699] [calyosensus_node]: Initialising Pipelines...
[INFO] [1738603062.336006058] [calyosensus_node]: Creating pipeline 'signal_capture'...

[INFO] [1738603062.336094015] [calyosensus_node]: Pipeline type is 'PassThroughPipeline'
[INFO] [1738603063.464681214] [calyosensus_node]: Creating pipeline 'signal_filtering'...

[INFO] [1738603063.464825603] [calyosensus_node]: Pipeline type is 'FilteredSignalCapturePipeline'
[INFO] [1738603063.464923337] [calyosensus_node]: Creating pipeline 'imager_2d'...

[INFO] [1738603063.465002681] [calyosensus_node]: Pipeline type is 'ResolutionImager2LogConvertedPipeline'
[INFO] [1738603063.465666961] [calyosensus_node]: Creating pipeline 'imager_3d'...

[INFO] [1738603063.465785496] [calyosensus_node]: Pipeline type is 'ResolutionImager3PointCloudPipeline'
[INFO] [1738603063.467114927] [calyosensus_node]: Pipelines initialised

[INFO] [1738603063.645239294] [calyosensus_node]: Processed frame # 0
[INFO] [1738603063.768747667] [calyosensus_node]: Processed frame # 1
[INFO] [1738603063.867169449] [calyosensus_node]: Processed frame # 2
[INFO] [1738603063.983315035] [calyosensus_node]: Processed frame # 3
[INFO] [1738603064.114894143] [calyosensus_node]: Processed frame # 4
[INFO] [1738603064.217563550] [calyosensus_node]: Processed frame # 5
[INFO] [1738603064.348000198] [calyosensus_node]: Processed frame # 6
[INFO] [1738603064.450135132] [calyosensus_node]: Processed frame # 7
[INFO] [1738603064.582122650] [calyosensus_node]: Processed frame # 8
[INFO] [1738603064.699759867] [calyosensus_node]: Processed frame # 9
# And so on ...
Foxglove
To use Foxglove you must also setup an additional node in your ROS2 environment to bridge the data over the network. To do this open up another terminal window and run the following command (Remember to source ROS again in the new terminal):
ros2 launch foxglove_bridge foxglove_bridge_launch.xml
You can change the port of the server by setting the port:= parameter.
For example: `ros2 launch foxglove_bridge foxglove_bridge_launch.xml port:=8564```
See https://docs.foxglove.dev/docs/connecting-to-data/ros-foxglove-bridge for further details about the other parameters.
Usage
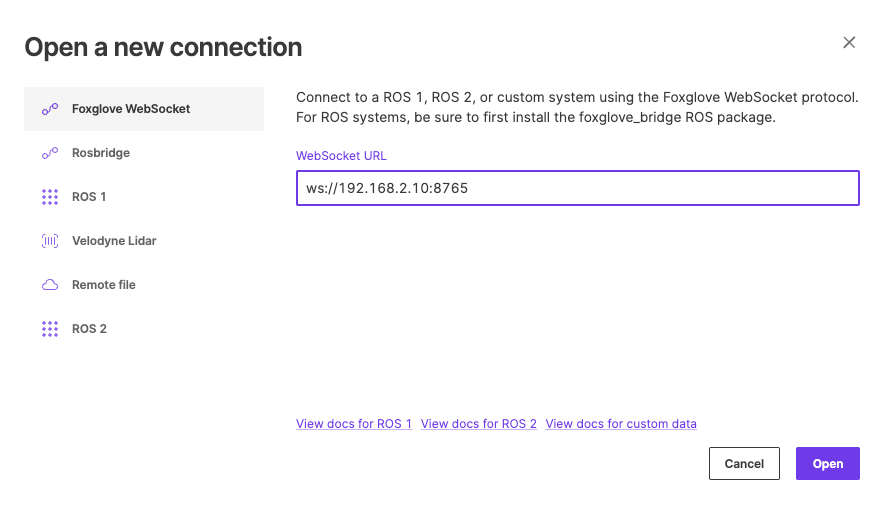
Once the server is running one the Foxglove studio app on the computer you have installed it on and connect to it by clicking Open Connection.
ws://localhost:8765 -> ws://<local_ip_of_ros_server>:8765
You can find your local IP address on Linux by running the command, ip addr show. Then look for the address label "inet" (often follow the syntax 192.168.X.X).
The calyoFoxgloveTools extension has a variety of panels to visualise the PULSE sensor data. Please download the example Foxglove layout which has all theses different panels pre-configured.
Import this downloaded layout by clicking Select a layout -> Import from file... and selecting the downloaded Calyo Plug and Play Tutorial Layout.json file.
Later you may construct your own panels and data sources.
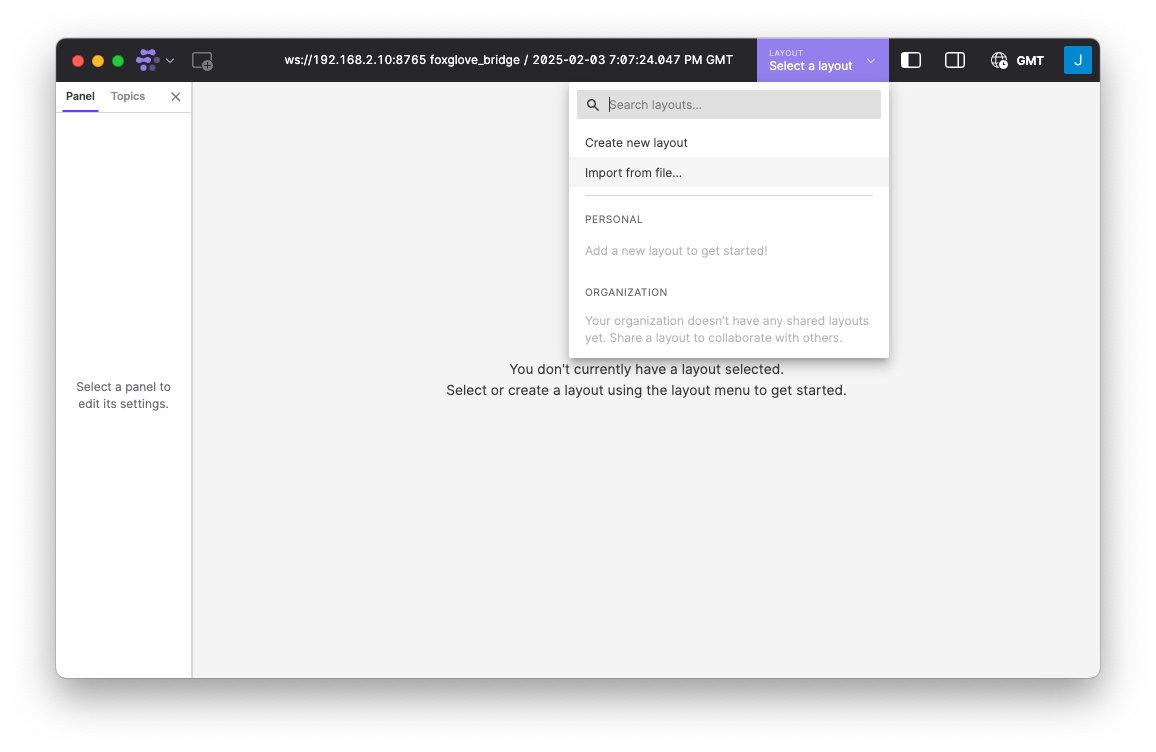 Once imported, you should be shown the following window:
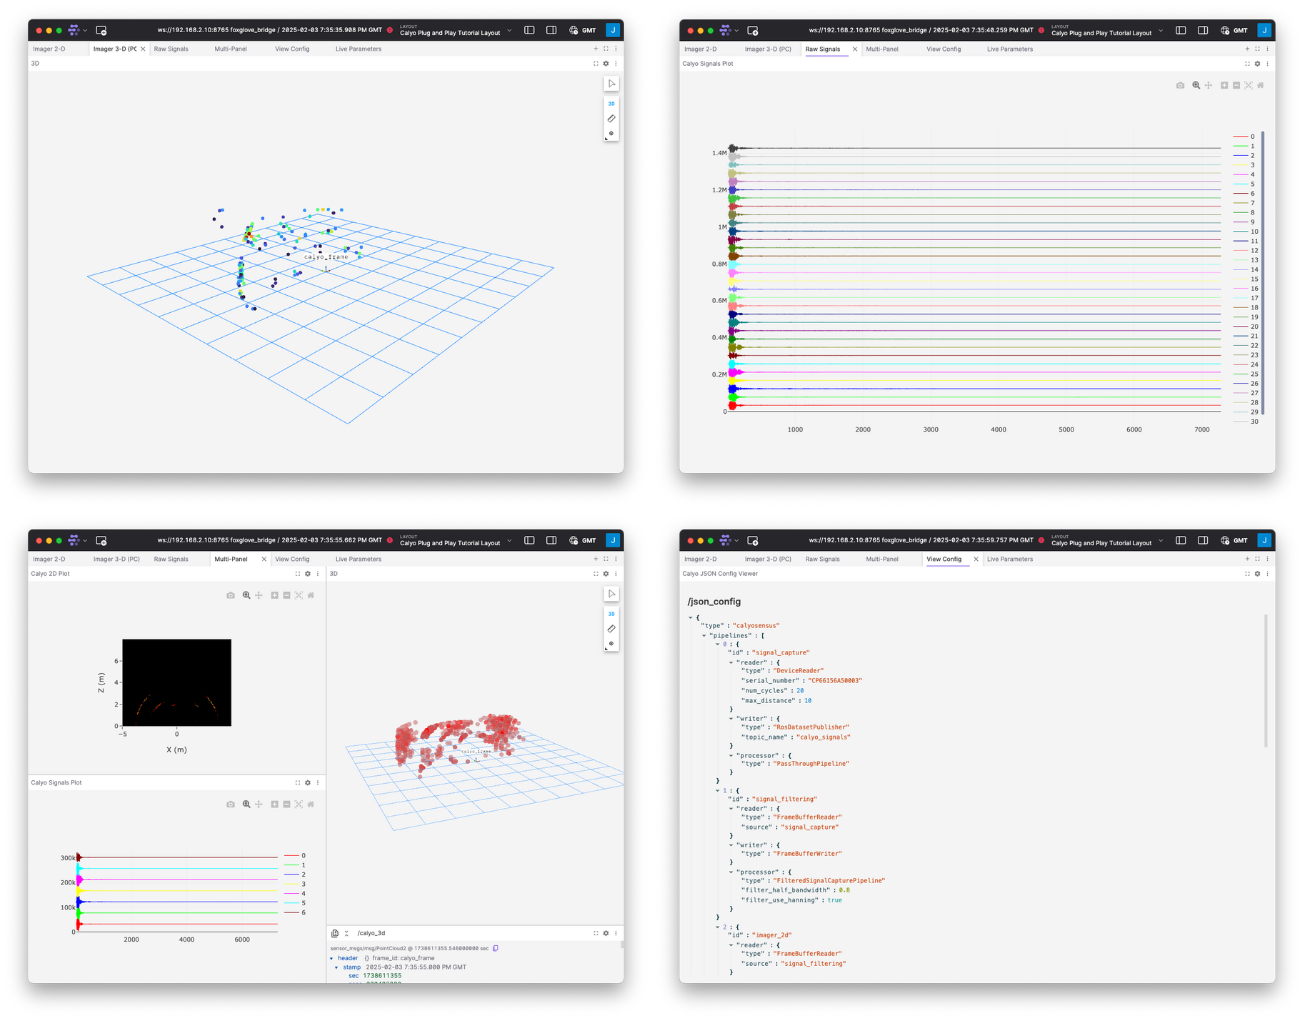
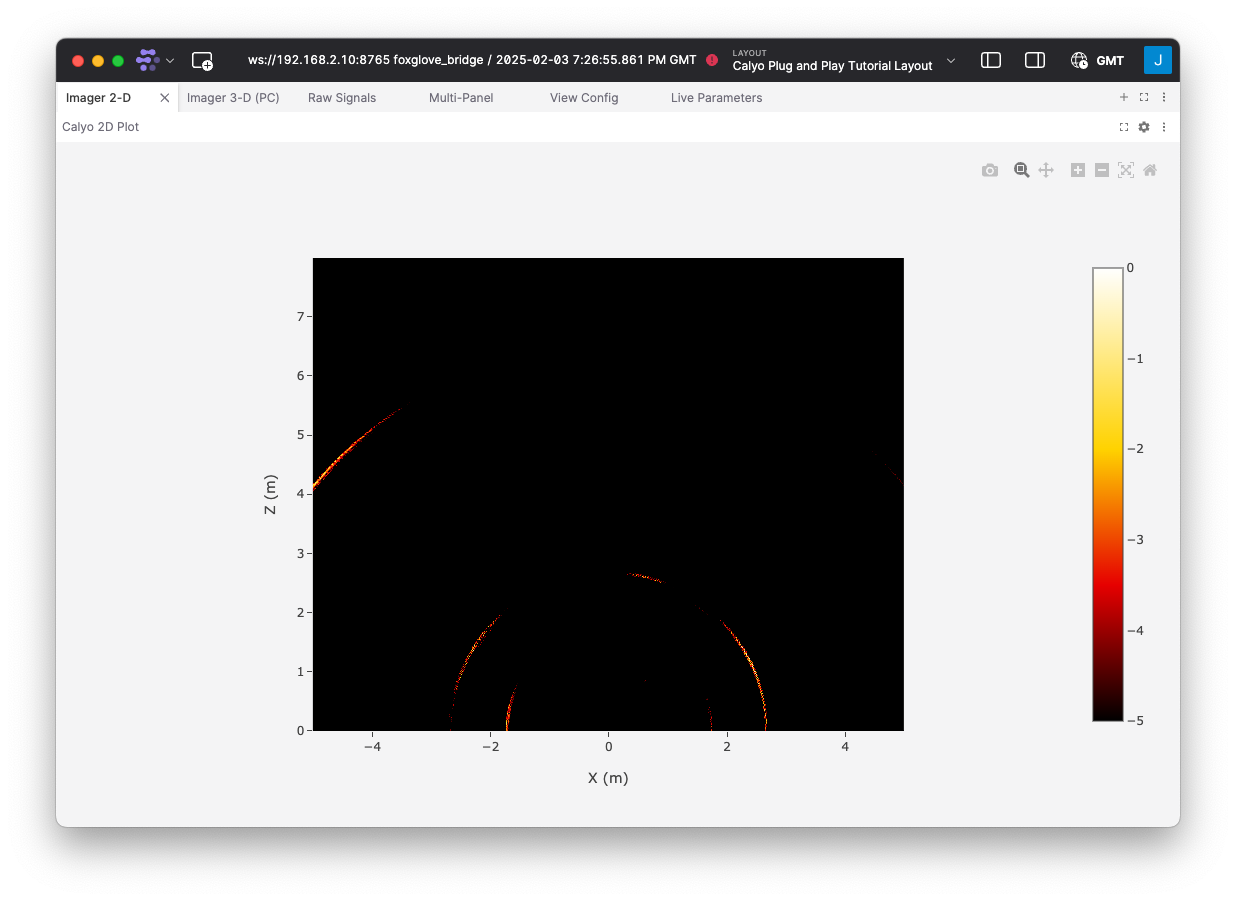 You can now navigate across the various tabs along the top to see what you can do and visualise with the Calyo SENSUS and Foxglove.
To learn more about the Foxglove and ROS2 integrations please read the full documentation: ROS2 & Foxglove or go to the next page to continue reading about the SENSUS SDK.